Lab 06 - Installing GNS3 VM on VMware Workstation
Yaser Rahmati | یاسر رحمتی
Last updated
Yaser Rahmati | یاسر رحمتی
Last updated
In this document, we will explain the import of the GNS3 VM for VMware but instructions for VirtualBox are similar.
NOTE
VMware is a better option because it’s faster and supports nested virtualization (the VMs inside the VM are accelerated by your CPU). The speed difference is important and some VM will be too slow on VirtualBox.
In this section, you will learn how to import the GNS3 VM into VMware Workstation on your local Windows PC.
NOTE
This document assumes that you already have VMware Workstation installed on your local Windows PC. Please refer to VMware documentation for the process to download and install VMware Workstation.
Extract the downloaded .zip archive downloaded from here.
This extracts the “GNS3 VM.ova” file stored within the compressed archive, in order to import it into VMware Workstation.
In VMware Workstation, click 'Open a Virtual Machine':
Navigate to the directory where the extracted GNS3 VM.ova is located, and click 'Open' to open the OVA:
Leave the virtual machine name as 'GNS3 VM', and click 'Import':
Caution
With VMware Player it’s recommended to keep the default location. GNS3 will try to detect VMs outside, but unlike Workstation VMware Player doesn’t offer a central database with all VMs location.
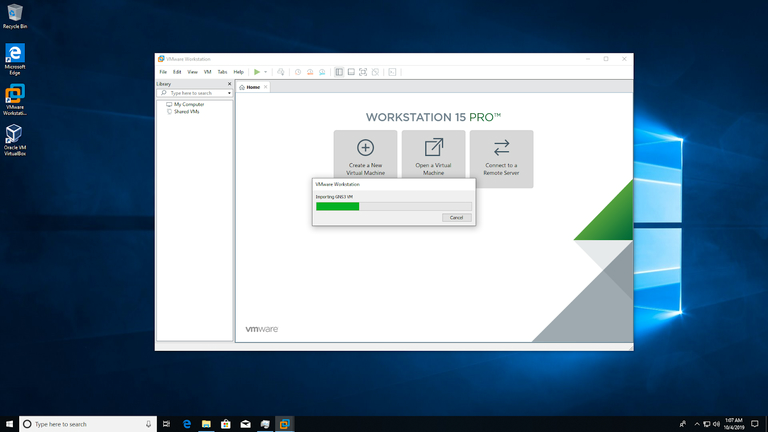
VMware Workstation will import the GNS3 VM:
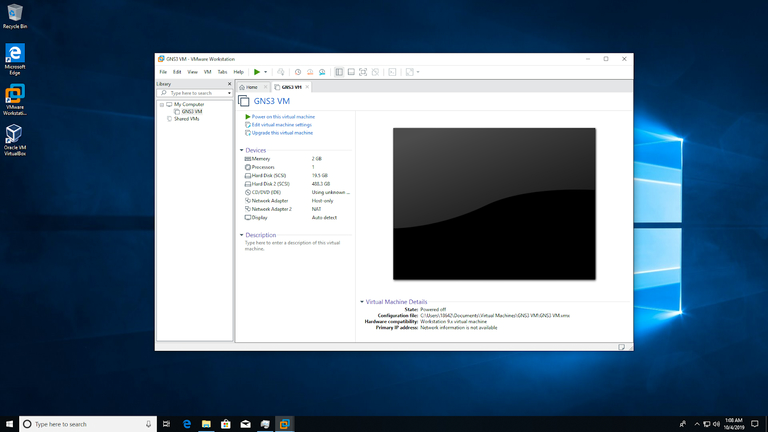
The GNS3 VM will show as available in VMware Workstation. Leave all settings at their defaults:
Congratulations! You have successfully imported the GNS3 VM.
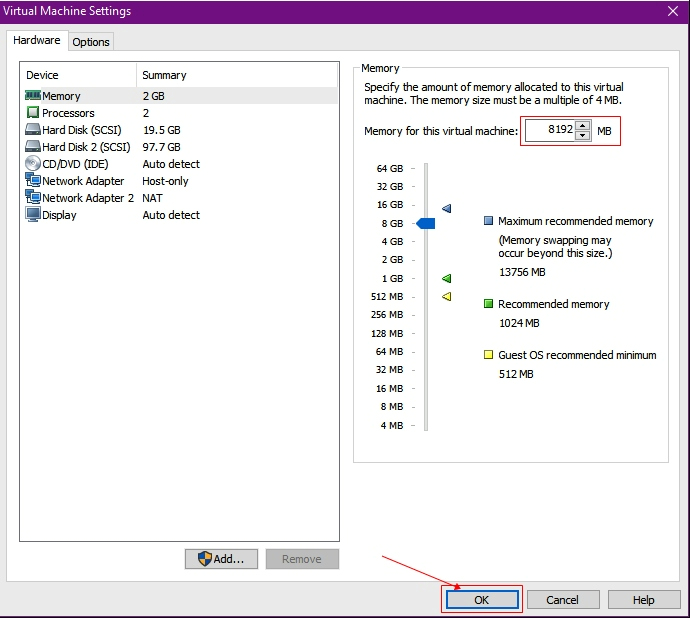
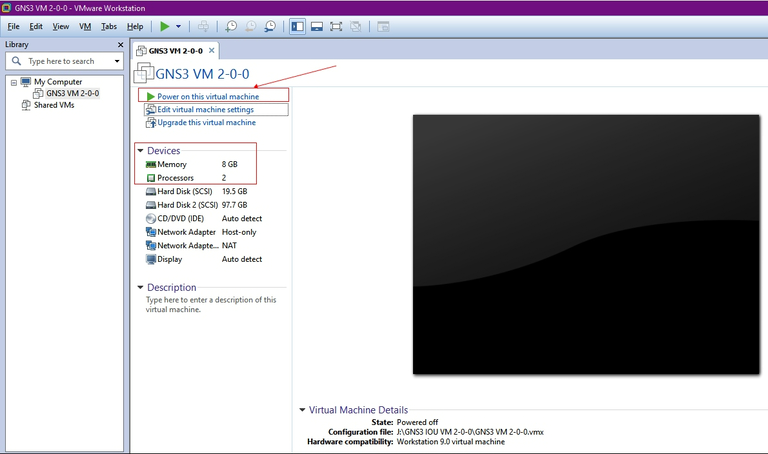
It is optional, if you want to change the setting of the new VM click on 'Edit Virtual Machine Setting'. Otherwise, you can skip it and power on the VM. Here, I increased the RAM from 2GB to 8GB and the Processor from 1 to 2.
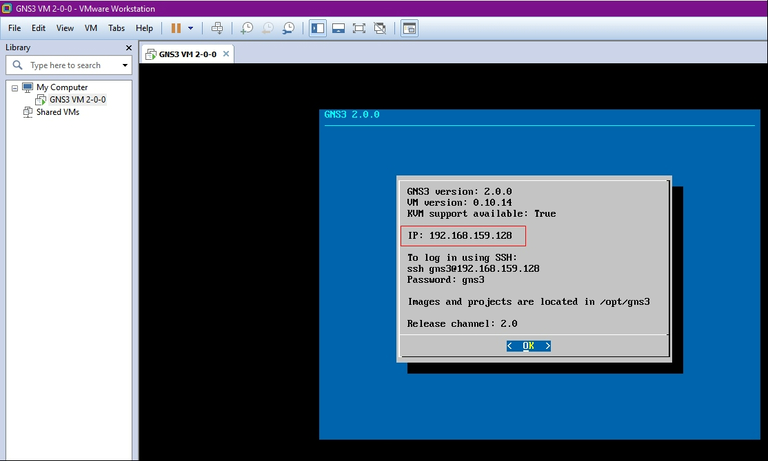
Now Power on the GNS3 VM.
We can observe that this VM received the IP address (192.168.165.128) from the VMware DHCP.
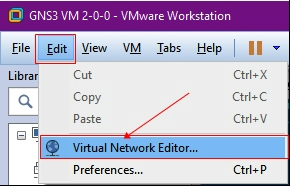
We can check the DHCP from where the VM received the IP address. Moreover, if you want to assign IP address as per your choice, change the DHCP network. I kept the same IP address.
This GNS3 VM is connected with Vmnet1, and having the network address 192.168.159.0/24. That’s why our VM’s IP address is 192.168.159.128, which is from the IP Address range.
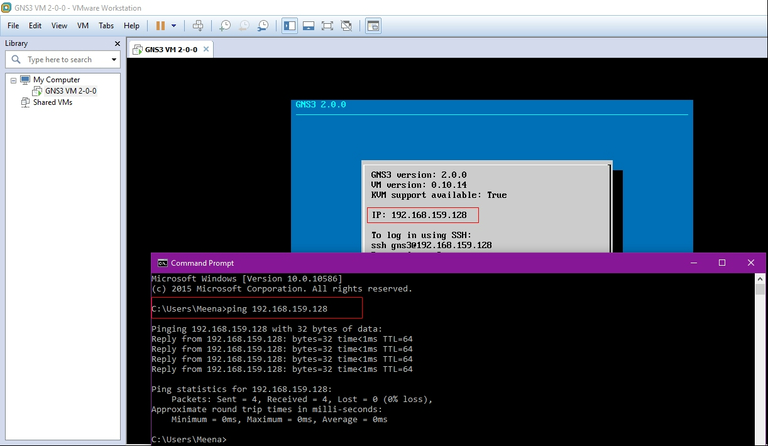
Test the connectivity from the Command line.
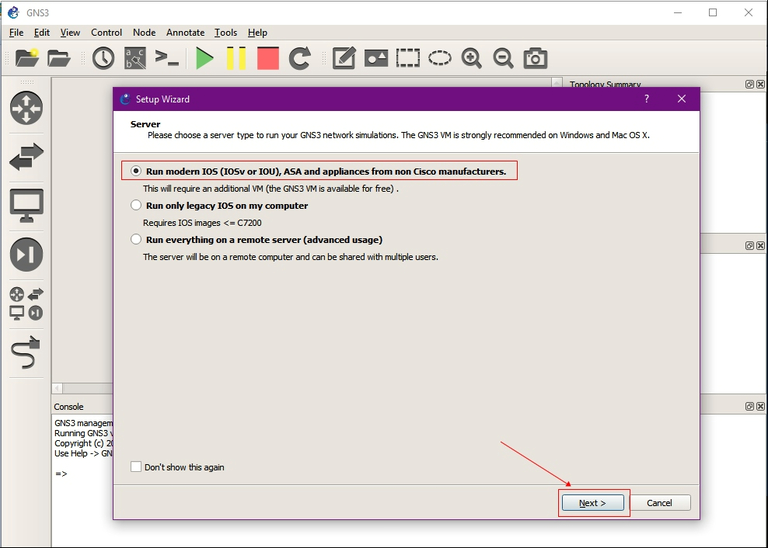
Start the GNS3 and then from the Help tab click on Setup Wizard.
Select the Server option 'Run Modern IOS (IOSv or IOU), ASA and appliances from non-Cisco manufacturers' and click on Next.
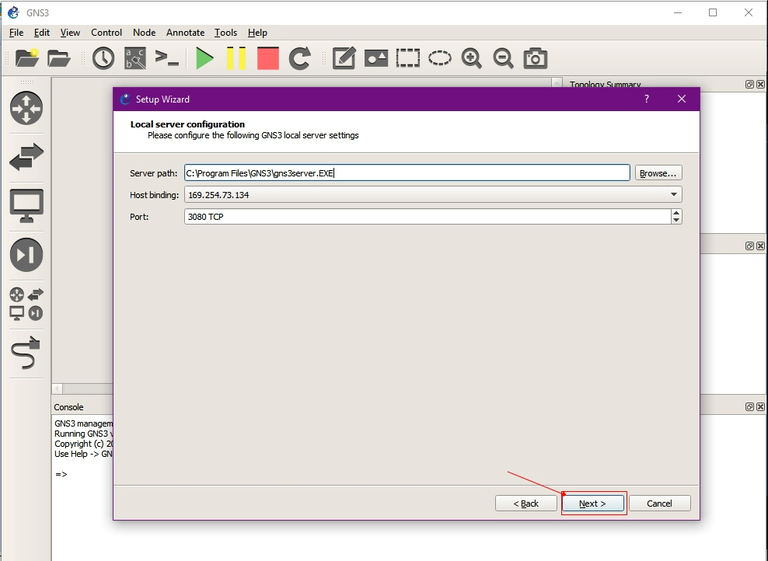
In the Local server configuration, whatever the IP address and TCP Port no. which is 3080 we will select now, next time it will use the same combination for running the Local server.
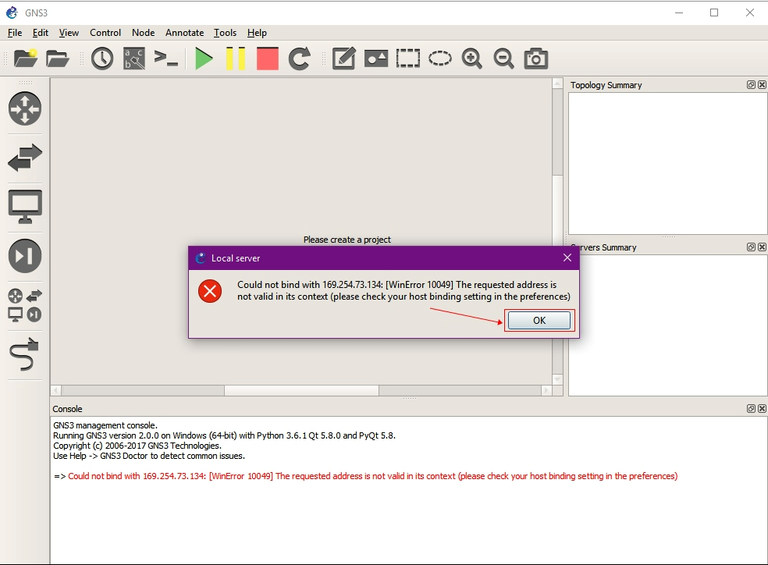
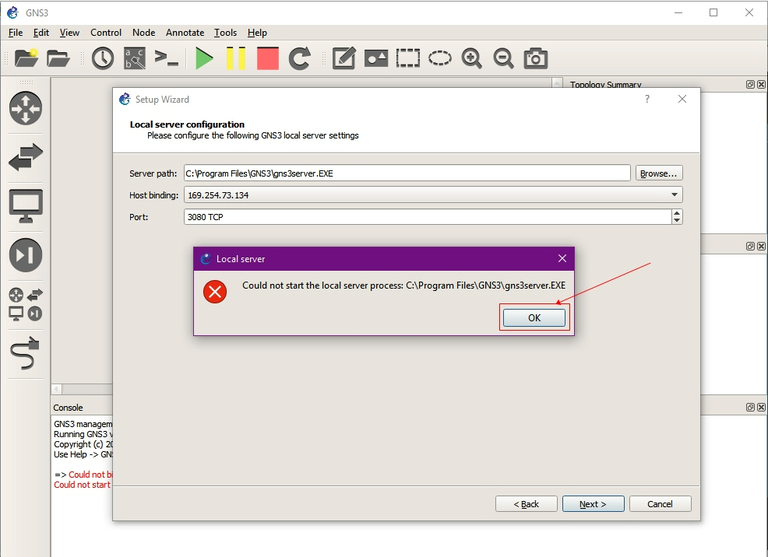
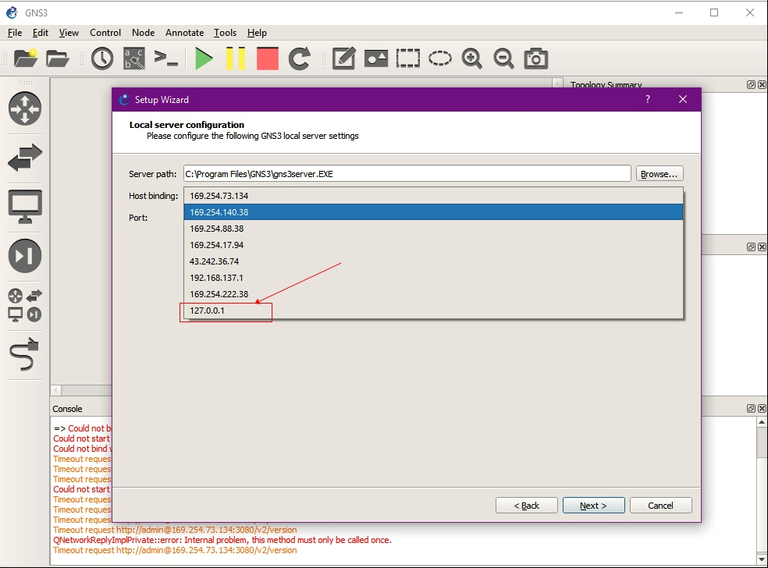
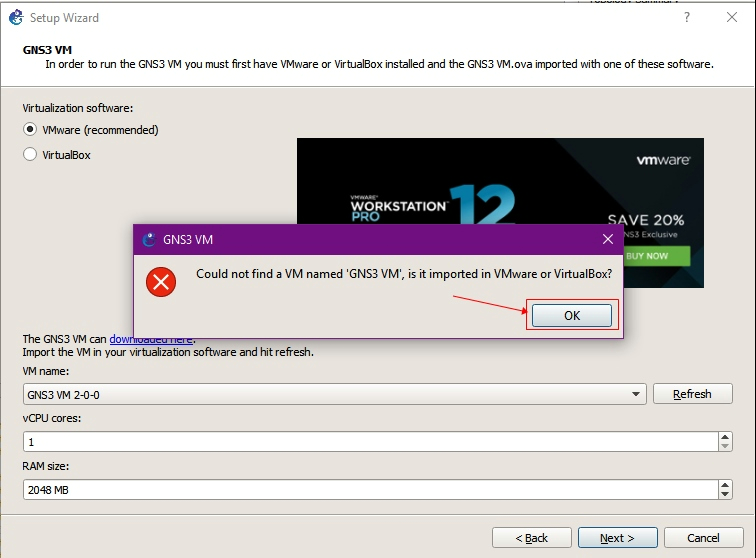
If you will face such type of error select the IP address 127.0.0.1 from the list.
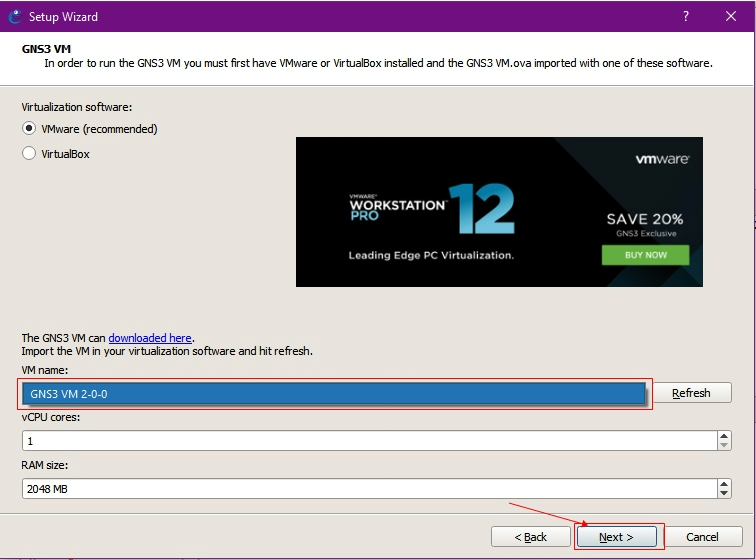
From this point, we will associate our GNS3 VM with GNS3. Click on the Refresh button in case of error.
Select the GNS3 VM.
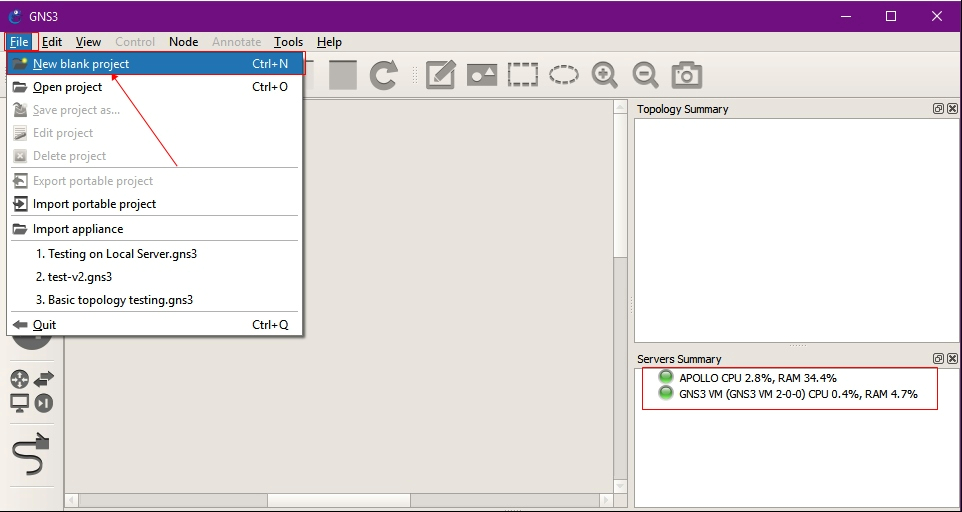
In the Server Summary, two servers are present, one is Local and another is GNS3 VM. Now, we have both the options for our projects and we can also use our IOS image on Local server as well as on GNS3 VM.
IOS image can be a normal image that we can run on Local and VM or IOU which we can run only on GNS3 VM. Without the images, we cannot create our topology, so that we have to set the IOS images which we want to use.
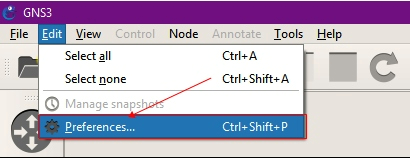
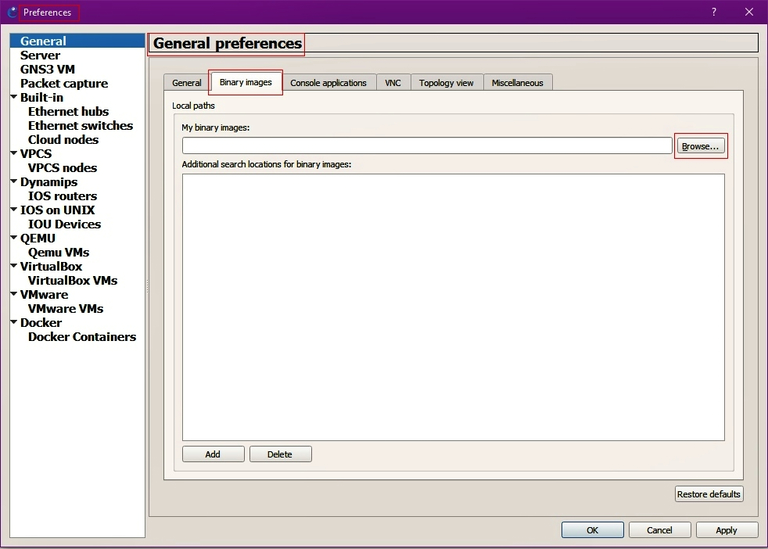
In this version we can place our IOS image in a folder and just give the path of it, whenever we will add a new IOS image from the Preferences automatically all the images in the folder will be appearing in the list.
Select the folder of IOS images.
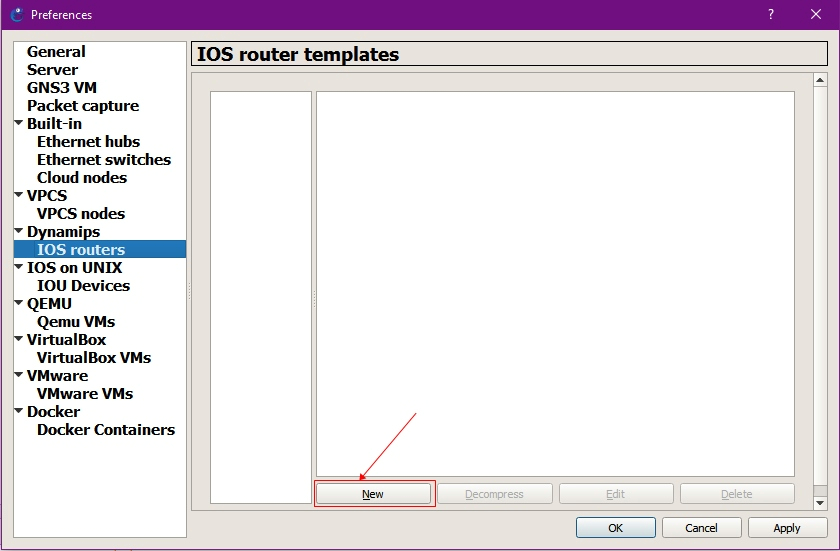
Add the new IOS images which you want to be used in your topology.
In my IOS image folder, I placed only two IOS images, which we can see in the list, this feature is different from the previous versions.
virtualization, VMware Workstation, hypervisor, virtual machine, VM, cloud computing, guest OS, host OS, snapshot, virtual network, vSphere, ESXi, vCenter, VDI, thin provisioning, virtual disk, ISO image, virtual hardware, VM clone, VM migration, VM snapshot, virtual appliance, VM performance, virtual CPU, virtual RAM, nested virtualization, VM template, virtualization security, VM backup, VM restore, VM monitoring, vMotion, VMware Tools, VM replication, storage virtualization, network virtualization, software-defined data center, VM encryption, virtual lab, virtual switches, VM provisioning, VM compatibility, VM configuration, VM optimization, VM isolation, resource allocation, virtual infrastructure
مجازیسازی, VMware Workstation, هایپروایزر, ماشین مجازی, VM, رایانش ابری, سیستمعامل مهمان, سیستمعامل میزبان, اسنپشات, شبکه مجازی, vSphere, ESXi, vCenter, VDI, نازکسازی, دیسک مجازی, تصویر ISO, سختافزار مجازی, کلون VM, مهاجرت VM, اسنپشات VM, وسیله مجازی, عملکرد VM, پردازنده مجازی, RAM مجازی, مجازیسازی تودرتو, قالب VM, امنیت مجازیسازی, پشتیبانگیری VM, بازیابی VM, مانیتورینگ VM, vMotion, ابزار VMware, تکرار VM, مجازیسازی ذخیرهسازی, مجازیسازی شبکه, مرکز داده نرمافزاری تعریف شده, رمزگذاری VM, آزمایشگاه مجازی, سوئیچهای مجازی, تأمین VM, سازگاری VM, پیکربندی VM, بهینهسازی VM, جداسازی VM, تخصیص منابع, زیرساخت مجازی
🌐 Personal Website 📄 Resume 🎥 Video Archive 💼 Finance Blog 🔐 Network & Security Notebook 🎬 Aparat Channel


